Tuesday, November 30, 2010

$3 Wreath in 10 minutes!

I keep seeing all these fun wreaths that people have made, so I wanted to make one too! I wanted to make one that my 3 year old could help with, so last week we drove past a little park that had a bunch of pine cone tree's (these tree's aren't very common in Vail,AZ), so we had a lot of fun going around the park finding all the pine cones we could! I really didn't want to pay money for pine cones, so I was super excited when we had found a whole bag full! We used the little ones on the wreath and we're going to save the rest of the pine cones for Brycen and his friends to decorate at his little Christmas Party next week! Tomorrow I"ll post about the fun things I am planning for the kids to do next week!
Okay, so back to the Wreath! I bought a 15ft pine garland (it's really thin so I ended up using the whole thing), an 18" round wreath and a small bunch of red flowers and berries (it came with 3 berry pieces and 4 flowers)! I found all of these at the dollar store, so it cost $3!

I then wrapped the garland around the wreath while the hot glue gun was heating up, then I put the glue on the flowers, berries and pine cones and Brycen pressed them onto the wreath and voila!

It's super simple, but we had a lot of fun making it, and the best part is that it only took about 10 minutes! Which is perfect for a 3 year old with a short attention span!

Sorry about the bad lighting for the pictures!

Monday, November 29, 2010

Magnet Quote!

I am lucky enough to work with the youth at church, and we get to have weekly activities! So for this weeks activity I had the opportunity to come up with a small craft for the girls to make! How awesome is that!!! Okay, so here's what they get to make:

and check it out (it's a magnet!):

This was made possible with the help of WONDERFUL friends, who I am SUPER indebted to! They have helped me out so much! They were the wonderful people who cut the vinyl for my craft night too! It's a mother daughter team, here's the daughter's craft blog:
http://kissingfrogstoo.blogspot.com/
and the mom's craft blog is:
http://uniqueinspirations.blogspot.com/
If you're interested in checking out their fun stuff!

Sunday, November 28, 2010

So excited for Christmas!

If I haven't already said it...I LOVE THIS TIME OF YEAR!!!! What time of year could be better, the chilly outdoors makes you want to snuggle up with some hot cocoa (with mini marshmallows of course), a blanket and a good book! Need to find me a good book....maybe this week sometime! I am getting SO excited for this week! Wednesday and Thursday night I have my way fun craft nights, then Saturday I'm doing a way fun cookie exchange! Okay, so we didn't get the mantle completely decorated, but here's a pic of what it looks like so far:

as soon as Brycen saw that I was taking a picture he jumped in :)
On another note, I LOVE Jim Shore decorations! So does my parents, I think they rubbed off on me! But if you're not familiar with Jim Shore, here is a picture of my favorite Jim Shore ornament!

I snagged this one 2 years ago on New Years Day!!! I was SOOO excited when I found it, I waited over an hour to buy it! I got it for 6$, which is an AWESOME deal for a Jim Shore ornament, it was originally over 30$! But Dillard's had all their Christmas Decor clearanced, with an additional 25% off the sale price on New Years Day. I am a HUGE fan of sales obviously :) I am actually terrible when it comes to sales, especially such great sales!!! So my reason for this post is to show you my favorite ornament and to say, think about saving a little money this christmas season and go shopping after Christmas for next year, you'll save SO much money! I do it almost every year! I have seriously saved hundreds of dollars on gifts and decorations by shopping this way. So that's just a thought :) Another store that has great deals after Christmas is Target! Well I promise to get back to deals and crafting this week, I've pretty much slacked off this past week, SORRY!

Friday, November 26, 2010

Shopping and Decorating!

Okay so I of course had to go shopping this morning, it's black Friday after all! My husband and I actually went late last night, and then I went again this morning! Oh the joys of shopping! I got these awesome 3 in 1 cake stands as wedding gifts (they cost 9.99$ and then I got an additional 20% off, so they came to $7.99 plus tax! How awesome is that!

I got some cute and simple long sleeve shirts for me and kids, just need to do some simple embellishments and then I'll post pics!
Last night my husband and I went to Toys R Us and got this way fun, cute and awesome little sofa for the boys! They absolutely LOVE it! (will post pics of this soon too, since I accidentally deleted the pics I took...darn it!)
But here's a quick picture of the boys having fun playing with the wrapping paper I got today:

Now to the decorating...we got the tree up today!!! So excited! My favorite decor though is the mantle display, we'll hopefully get that done tomorrow and I can show you why I love it SO much!

and MERRY CHRISTMAS! I love this time of year, it just feels so magical!!!

Wednesday, November 24, 2010

Silhouette Giveaway!

Just go to:
http://www.theidearoom.net/
or
http://bedifferentactnormal2.blogspot.com/2010/11/silhouette-sd-review-and-giveaway.html
or
http://shanty2chic.blogspot.com/2010/11/silhouette-machine-giveaway.html
or
http://tatertotsandjello.blogspot.com/2010/11/just-in-time-for-christmas-silhouette.html
or
http://thriftydecorchick.blogspot.com/2010/11/silhouette-craft-cutter-giveaway.html
or
http://www.infarrantlycreative.net/
or
http://karaspartyideas.blogspot.com/2010/11/another-silhouette-craft-cutter.html
to enter to win a silhouette SD cutter, they retail for $299, they can do all sorts of fun stuff, they are better than a cricut because you don't have to buy expensive cartridges for them! Yes! There are a bunch of sites offering this giveaway! So go vote at all of them and who knows...maybe you'll win!!!

Monday, November 22, 2010

FINALLY...I made me a Menu Plate :)

I found this cute, simple plate at Pier 1 Imports on friday, it was in the clearance section, it was originally 5$ each but I got 4 of them for .98 cents each! They are not super fancy or colorful, but I figure they can go with just about any kitchen! They are not full size dinner plates, they are more like lunch size plates, but that was okay with me since I don't plan to add all the days of the week. So now I have one for me and 3 to use as gifts! Plus, with both Robert and I in school I try to make gifts as inexpensive as possible! So here is how I made it:

I used a crayola washable marker to mark off the edges (the marker rubs right off), you can use a ruler to mark off how much of an edge you want on it, then tape it!

All taped up and ready to be painted! You want painters tape!

This was the second coat of paint, I went ahead and did one more coat just to make sure the edges got done. I also did my coats before it had completely dried, not sure if that's such a great idea, but they seemed to turn out great, so I don't see why it would be a problem :)

So here is my Menu Plate :) I love it! I think it is just the right size, and I like the idea of just writing one day at a time instead of a whole week, since anytime I write a whole week I am always changing it day by day.

Almost all of my plates had a few spots where the paint had seeped under the tape, this was probably the worst. But don't worry if this happens! I just used my finger nail to scratch it off. Once I had scratched it off you couldn't even tell it had happened :)

Here are the 4 I got done last night :) Now I am just about done with Christmas, I have all my Christmas shopping done except for a few frames that I plan to pick up friday, I just need to finish making some of them.

I just need to get the vinyl for the last 3 plates :)

Sunday, November 21, 2010

Christmas Activities!

This year I wanted to do fun holiday activities with my kids. So I decided to come up with a list of fun things to do everyday. If you have any other ideas do tell :)
Here is my List of 24 Christmas Activities:
-make/start an advent calendar
-make candy molds
-read books
-make pinecone ornaments
-go Christmas caroling then go home for yummy cookies and hot cocoa
-make Christmas cookies
-make homemade carmels
-have a Christmas party
-make Christmas cards
-make a Christmas gift for someone else
-make a paper chain
-make snowflakes to hang
-make a gingerbread house
-make a candy train
-wrap Christmas presents
-string popcorn
-drive around looking at Christmas lights
-Go see Santa Claus
-make carmel corn and watch a Christmas movie
-red/green night – only serve food in these colors for a night
-PJ night – everybody gets a new pair
-read the christmas story
-take a meal to a family who’s sick or needy
-go to a Christmas party (the ward Christmas party is Dec. 10th)
-write a letter to santa too!!!

**I got some of my ideas here: http://247moms.blogspot.com/2009/11/25-days-of-christmas-countdown-fun.html**

Also, this week is thanks giving so I found two little activities I"m hoping to do with the kiddos:
Pilgrim Cookies (I actually have all the stuff for these, so we'll probably make them Tuesday)

Some cute pine cone turkeys (i figure if I can't find any, then I'll buy a bag of them and use them again next month to make pine cone ornaments with the kiddos)

**I saw these on a blog the other day, but can't remember which one**

Finally a quilt!

Here's a pick of one the quilts that I finally sewed from all the squares I cut out last week! I'm giving it to a wonderful lady in our ward at church, hopefully I can take it over to her this week!

I folded it so you can see the two sides

Saturday, November 20, 2010

Day 7, the last day for the craft night tutorials: HOHOHO Blocks!

You can stack them however you wish. I would do a step by step for you but I have to leave for Mesa in about 10 minutes. So here is what you do:
I'll have 3 4x4inch blocks for you (they'll be sanded), then you'll want to paint each one, this will probably take about 30 minutes so you can do touch ups and let them dry. Then you press the vinyl on and paint some varnish over them and voila! Some super cute holiday decorations for cheap! They would even make a fun gift! The vinyl costs 4.80$ and the paint, wood and varnish cost .70 cents. So it comes to 5.50$.

Friday, November 19, 2010

Day 6 of the weeklong craft night tutorials: Snowman Can!

I have actually done a post on these already too :) They are very simple to make, and pretty fast! A few years back we made a bunch of these as gifts. If you buy the big 10 inch cans from the cannery you can even make them out of those! We did! But that means you have to fill it with a lot more goodies! So it's up to you what size can you want to do. I"ll have some regular vegetable size cans available for use, but if you want larger cans then bring your own. It costs about 75 cents per can.
All you need is:
red felt
white felt
orange felt
some black buttons for the eyes
some black fabric paint for the eyebrow and mouth
some cute strips of christmas fabric
and a little bit of leaf/berries.
(I'll have all of these supplies for you to make them)
*you can even put a little bit of pink chalk for rosy cheeks*
Just hot glue it all to a can and voila! A cute and creative Christmas gift! Then you can take them home and fill them with whatever Christmas goodies you want. Or you can use them as a decoration - we do!

Thursday, November 18, 2010

Day 5 of the awesome craft night tutorials: Pendant Necklaces!

Start out by cutting a small square of scrapbook paper to fit your tile.

You'll use this wonderful creation - Diamond Glaze - to glue the scrapbook paper on the tile.

Just place a small dot of diamond glaze onto the scrapbook paper, then press onto the tile.

Just put a small dot of 'E6000' glue on the bail.

Press the bail onto the back of the tile (on the scrapbook paper), center it as you want, then let dry overnight.

and Voila! A super cute necklace! You could make a bunch of them and customize it to your specific outfit :) Or make them as gifts!

They cost $1.25 each!

Wednesday, November 17, 2010

Day 4 of the ongoing christmas craft night how to: Menu Plate!

Okay, so I haven't made one of these before but read several tutorials, they are pretty basic, so here is how you do it:

Step 1: find the perfect square plate (the size of a dinner plate)!

Step 2: use blue painting tape and tape around the edges (the part you don't want chalkboard paint on)

Step 3: spray chalkboard paint all of the part that is not taped (the whole middle area), then let dry.

Step 4: Press vinyl on plate and voila! You have a super cute Menu plate to use in your kitchen or give as a wonderful gift!

-It's $3 for the blue tape, paint and vinyl! You just bring your own plate :)

Here's where I first saw these:
http://brownpaper--packages.blogspot.com/2009/09/chalkboard-platemenu-style.html

I'll post some fun pictures as soon as I get mine made! Hopefully by Saturday!

Tuesday, November 16, 2010

Day 3 of the super fun craft night tutorials: Earrings!

Like yesterday I've already done a full tutorial for these, so I'll just do a quick one real fast! I'll have the scrapbook brads here, in fact I will probably have them cut and ready for you to glue so that it only takes you about 30 seconds to make them :)
You start with these brads:

Once the brad back is cut off (I just used a regular pair of scissors), you put a drop of glue onto the back and push the earring part on. It only takes a minute or two to dry!

Taduh! Some cute, super easy, super fast earrings!

You can even use them as party favors or gifts like so:

They cost 60 cents each to make :)

Monday, November 15, 2010

Day 2 of the super fun craft night tutorials: Cake Stand!

I'm going to cheat, I actually did a tutorial on this the first of october, so if you want to see the full tutorial just go to: to:http://confessionsofaclearanceshopaholic.blogspot.com/2010/10/home-goods-versus-dollar-store.html
But for the craft night - here are the two options!
Option 1: "and visions of sugar plums danced in their heads..."

here it is so you can see the bottom:

Option 2: "Cookies for Santa"

Here's the full view:

How do you make this you ask? You take a bowl and glue it upside down to a plate and voila! A super cute cake stand! Then you just put the vinyl on top and you have a wonderful gift, or fun cake stand for yourself!
Prices:
Option 1 - sugar plum fairies: $5.50 for 1 color of vinyl, $6.25 for 2 colors of vinyl or $7 for 3 colors of vinyl(pictured) - this price includes everything to make the whole cake stand.
Option 2 - santa's cookies: $5.50 this includes everything to make the whole cake stand.
If you still have questions just send me an e-mail or leave a comment :) Thanks!

Enter this giveaway!

Hey everyone! I just entered a giveaway on Sugar Bee Craft Edition, she has a giveaway for a free apron, they are SO cute! If you think "I"ll never win a giveaway" you're wrong! Back in October I entered several giveaways and I WON 2 in one week! How lucky is that! I won a 20$ gift certificate to Say it On the Wall (vinyl lettering), and a 15$ gift certificate to Piggy Paint (non toxic nail polish). So enter, the winners are totally random and who knows, maybe you'll win a SUPER cute apron! To enter just click on Sugar Bee Craft Edition in the right side bar!

Sunday, November 14, 2010

Day One for my Craft Night Tutorials: Pajama Pants!

This is officially day 1 of the wonderful craft night tutorials, this is going to be a fun week, it's so exciting to know what I'm actually going to be blogging about rather than trying to figure something out everyday. Plus I am SOOO excited for the craft night, it'll be SO much fun! I hope everyone that wants to come can make it!!! Alrighty, well enough jabbering and onto the PJ's!
Step 1 - You want to find a pair of pants, they don't have to be pajamas, but you want a pair that fits your child perfectly! I chose a pair of pj's that fit Brycen great. Then you fold them in half and lay them onto your fabric, this is how you're going to measure how much you need:

You'll want to cut about an inch around it and then about 2 inches on top so that you can fold it under for the elastic (but we'll go into that later):

Remember to have cut 2 layers of the above! Then you do it again. So you'll have 4 pieces total because you have the front and back of each leg:

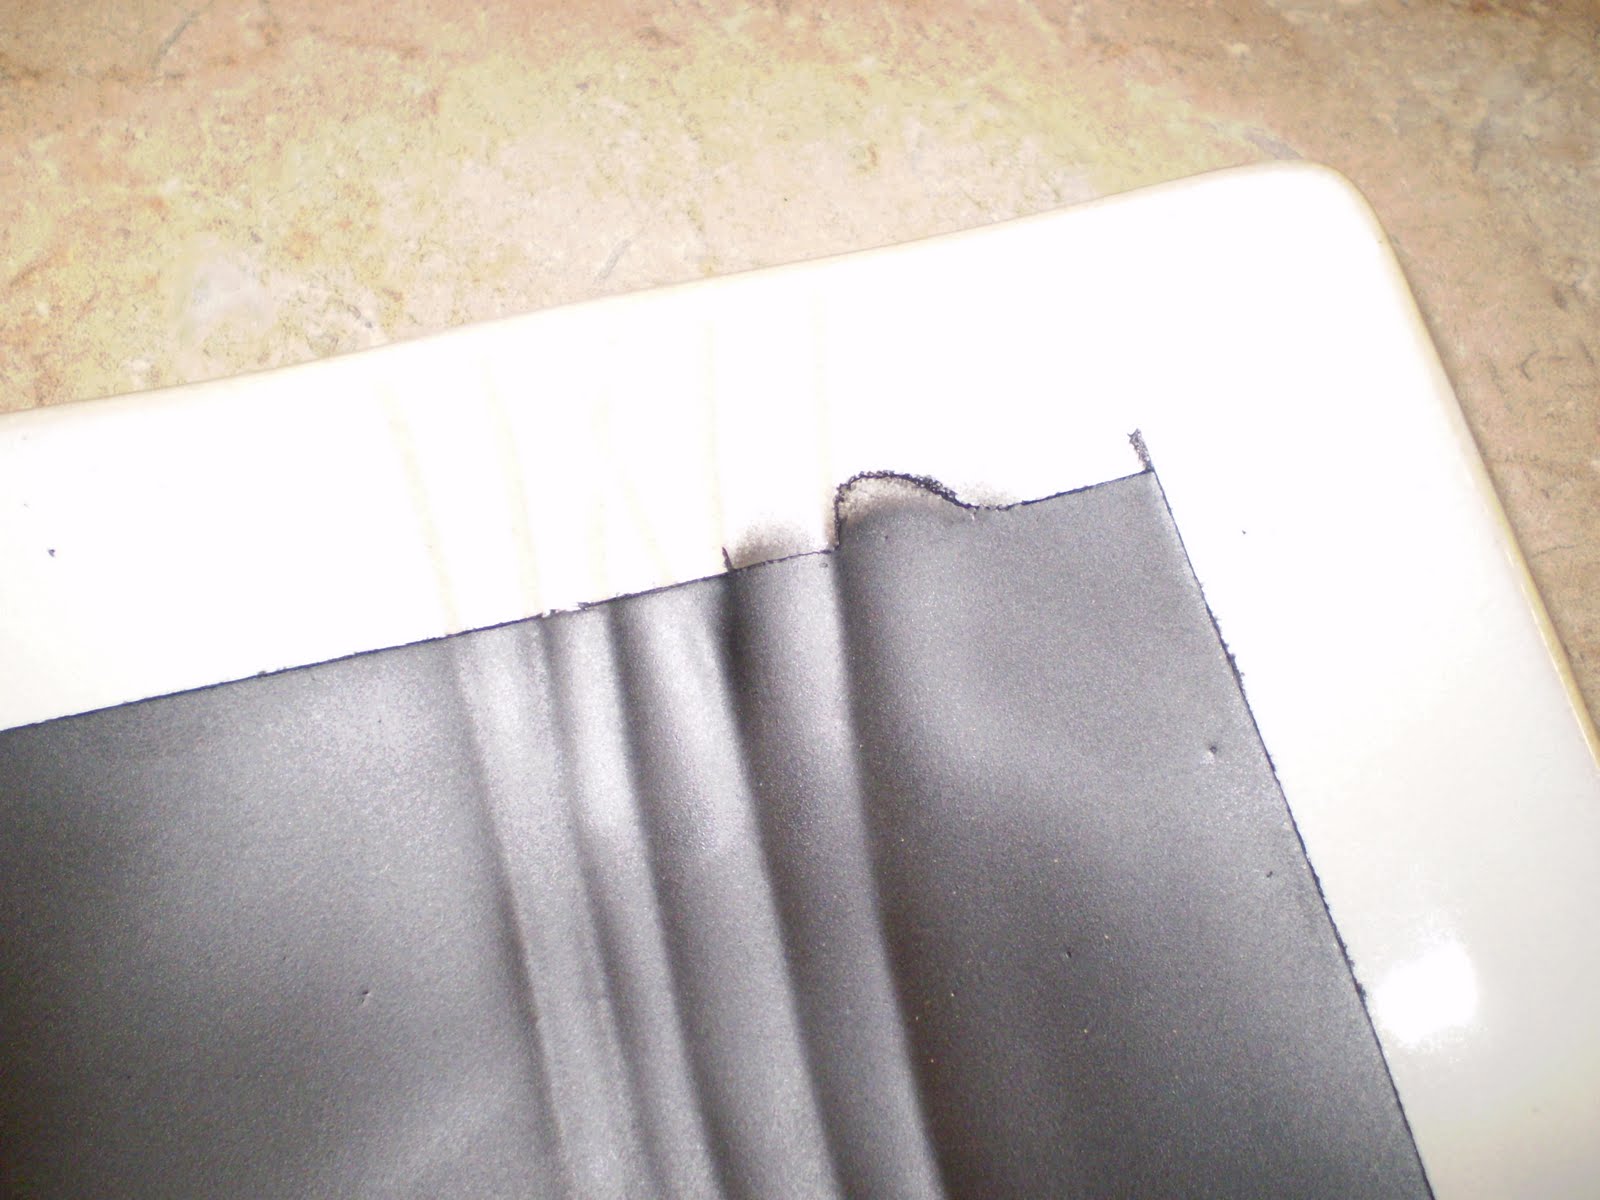
Now you need the sewing machine! You'll want to flip your 2 pant legs inside out and sew all the way down the straight side, then sew from the bottom of the leg to the crotch (about where the corners touch) on both legs:

Now here's the confusing part - it's really easy once you get it, but the first time it's slightly confusing (at least for me because sewing is pretty taboo for me, everything I make is a new and exciting adventure). So you'll want to leave one pant leg inside out, but turn one right side out. Then slip the right side out piece into the inside out piece like so:

Then you'll want to sew from one side of the top to the other, remember you want the right sides in touching:

So you just sewed the two pant legs together, go you (if you're making these of course)! Then pull the one leg out and taduh, you have pants...almost:

You have two more steps to finish them! You want to turn the bottoms in about 1/2 inch, and sew around it so that the bottom of the pants is hemed, like so:

Lastly - the waist band! Since my son is asleep I measured the elastic by his pants, I placed the elastic loosly around his pants and cut it the same size:

Then you sew the two ends together with a zig zag stitch:

Okay, this REALLY is the last step!!! You place the circle of elastic into the top of the pants and fold the fabric over it, then you just sew right under the elastic (DO NOT sew over the elastic or it wont scrunch!):

As you go you can scrunch it up so that you can sew all of the fabric down:

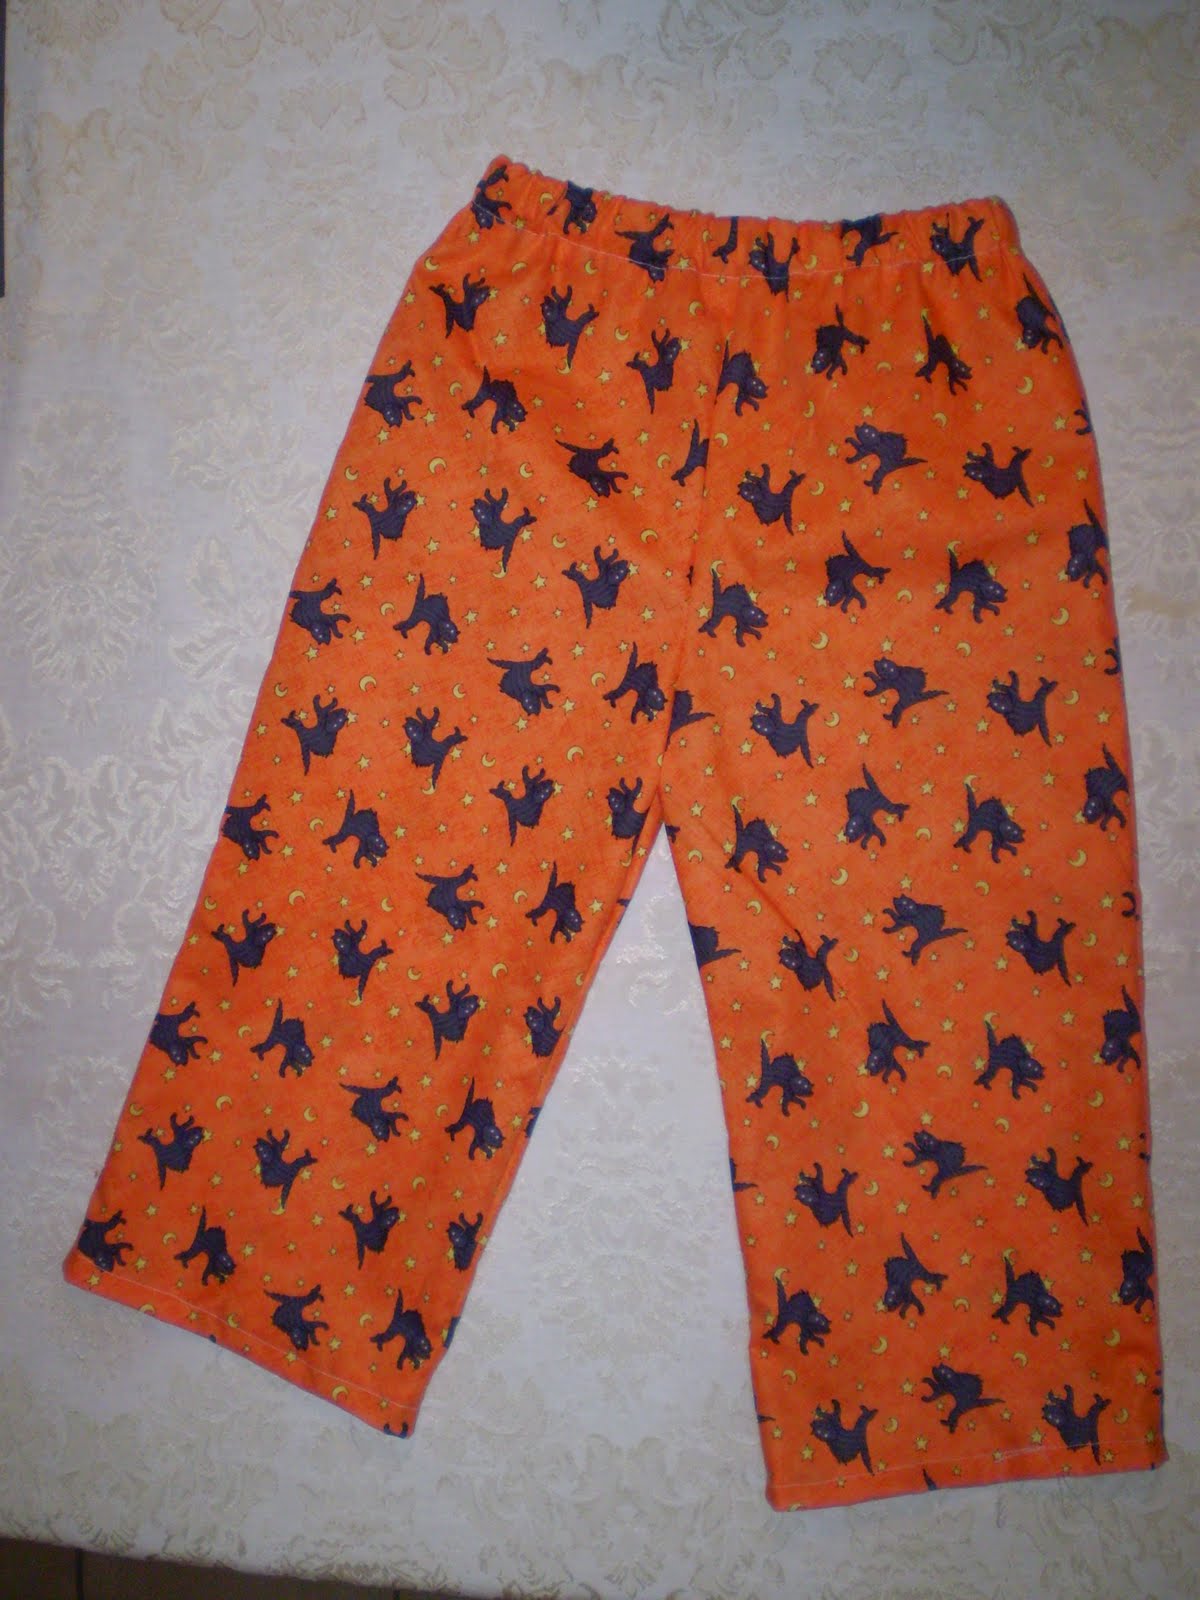
and VOILA! You have a super cute pair of pajamas pants! Who needs to go to the store to buy them when you can whip them together in about 20 minutes!!! I got my boys in bed at 7, sat down at 7:10 and started cutting the fabric out, and was done sewing all of it by 7:35 (it took an extra 5 minutes because I was talking to my sister on the phone and searching for where I put my elastic). I know this might seem kind of confusing but I promise that if you come to the craft night I'll help you make a pair and then you'll be a pro! Once you've made them you know how! It's SO easy!

Oh and now you know how much fabric you'll need! Just measure the length of the pants you want to make but add 2 inches to the top, 1 inch to the bottom and 1 inch to each side and that will tell you how much you need. If you still have questions just shoot me an e-mail or leave a comment :) Hope everybody has had a WONDERFUL Sunday!

Saturday, November 13, 2010

Restaurant.com 80% off

restaurant.com is having another sale, it ends Monday Nov. 15th, enter code GIVE and you get them for 80% off. We love these gift certificates! That's 2$ for a 25$ gift certificate, you have to spend at least 35$ at most of the restaurants and pay tip, but it's still 25$ that you don't have to pay :)

Accuquilt Go Cutter

Last year for Christmas I decided to make rag quilts for my boys, my husband, my niece and my brother. The one for my husband was 10 yards of fabric, and the one for my brother and boys were 8 yards of fabric. They took FOREVER to make because I cut out all the squares by hand with a pair of scissors, sewed them, them sniped all the edges all over it. In fact, I was so smart, that decided to smash my leg into an open pair of scissors and had to glue it shut with crazy glue because I refused to go to urgent care. So, after I finished all those blankets, my hands were super sore and I wasn't sure I'd be making anymore for a while. Then Christmas morning comes along and there's this big gift under the tree for me, so I was VERY surprised to find an Accuquilt Go Cutter with a bunch of die cuts, one being a rag quilt die cut. My wonderful husband and amazing father had found this for me! So no more snipping and cutting rag quilts for me anymore, I just run it through the roller and voila, perfectly cut rag squares! This is what it looks like in case you've never heard of them (which I hadn't before I received the wonderful thing)

So all day today, in between playing with the kiddos, I've been cutting rag quilt squares, I've gotten 17 yards cut so far and I have about 6 more yards to cut until I"m all done with all the flannel I bought to make blankets this past year. To use the cutter, you start with a die cut(this is the rag quilt one):

Then you lay 2-4 layers of fabric on the die cut and lay this clear cutting mat over it like so:

Then you just roll it through and you have perfectly cut squares! They have all types of die cuts, so you are not limited to just different sizes of squares, they hearts, butterflies, circles, strips etc.

I ended up with this bin of squares that I will be able to have fun sewing this week!

The fun part is that this week as I show all the fun craft projects I'm doing at my craft night I'll also show one or two of the quilts I've gotten done. I have enough fabric to make 9, so hopefully I"ll be able to get them all done this week! So look forward to tomorrow, I"ll be showing how to make the super easy and super fun pajama pants!
**If anyone plans on buying one of these, you can get them through JoAnn's and you can use a coupon on them!!! So that saves some big bucks! I'm hoping to buy the larger rag quilt die cut on black Friday, since they normally have extra coupons then!