Saturday, December 3, 2011

Patchwork Ornaments and Snowman Can's

I bought a pack of 3 inch Styrofoam balls as the main part of the ornament.
I cut up pieces of fabric into squares about 1 1/2 inch to 2 inches. Then I took my scissors and pressed the fabric into the Styrofoam. I just kept adding more pieces until I had covered the whole ball. Then I put a small bit of hot glue on the end of the ribbon and pressed it into the ball between two pieces of fabric.
I made 4 of them, I made these for someone else, I can't wait to make some Christmas ones!
These snowman can's are SO much fun! They are pretty quick to make and can be filled with all sorts of goodies! I used an empty veggie can, hot glued white felt around it. Then hot glued the red felt and 3/4 inch around the top. Then I hot glued a piece of Christmas fabric around the bottom and top to cover the ends of the felt. For the nose, I cut a small circle and twisted it into the nose, then hot glued it on with two black buttons as the eyes. I used black fabric paint for the mouth and eye brows.
The ornaments and snowmen took about 20 minutes each to make. They each cost about 60-70 cents. A super fun and cute gift!

Tuesday, November 29, 2011

24 DAYS FOR CHRISTMAS

I am super excited about my advent calendar...I was a sucker and ordered one on ebay because I didn't want one as big as the pattern I found on the site that I mentioned in the last post. So in the advent calendar, I plan on putting two little pieces of candy each day and a little piece of laminated paper with one of the below activities. I can't wait till Thursday to start!!!
-make homemade caramel
-make a candy train
-go see Santa Claus
-have a picnic by the Christmas Tree
-Red/Green night - only serve food in these colors for a night
-decorate the Christmas Tree
-make a Gingerbread house
-drive around looking at Christmas Lights
-wrap Christmas presents
-go Christmas Caroling - then go home for yummy cookies and hot cocoa
-make Christmas Cards
-write a letter to Santa
-make candy molds
-make a paper chain
-make footprint snowmen
-string popcorn
-PJ night! everybody get a new pair of PJ's
-host or go to a kids Christmas party
-make snowmen out of marshmallows
-make caramel corn and watch a Christmas movie
-Read some fun Christmas books
-make snowmen pancakes
-take a meal to a family who's sick or needy
-make a Christmas gift for someone else
-make edible snowflakes
-make snowflakes out of paper to hang
-make sugar cone trees
-make Christmas cookies
-read the Christmas story
-make pine cone ornaments
-make Christmas Pizzas
These are all just ideas, we aren't doing all of them, but definitely most of them! Most of them are free and a few cost a small amount of money. Hope you all are having a wonderful Christmas season!!!

Tuesday, November 22, 2011

Happy Holidays :)

Okay, just so everyone knows, I haven't dropped off the face of the planet! Life has just been crazy and I haven't had the energy to be craft, but Thanks Giving is 2 days away and Christmas is nearly upon us. Which means...lots of crafting must me done! I have lots of projects I'm getting supplies for this weekend and then I'm sure I"ll be posting lots of fun things! Plus I'll have a camera by then too! Mine sorta bit the dust - too many falls in the rocks, concrete and brick, surprised it lasted 4 years!
Now to the main reason I'm posting - I have been dying to make an advent Calendar by December first for my kiddos, I grew up with one and I loved it, it's one of my favorite Christmas traditions. But trying to cut out all the little pieces for the pockets has been making me crazy, so in all my searching today - I was about to just buy one - but alas, I found this AMAZING tutorial/pattern!!! You should totally check it out!!! I'm planning on making square pockets instead of ornaments, but I love that it has a print out for all the cute little characters that go on the pockets! So I will have mine posted by next week!!!
Happy Thanksgiving everyone!!!

Tuesday, October 18, 2011

Mummy Cans and Candy Bouquets

For the Mummy Cans you start with some empty cans (I just used vegetable cans and removed the paper), some muslin, tacky glue and some googly eyes.
I didn't really picture the next part, but you're doing to want to tear your muslin into strips, then tie the strips together. Once you've done this you'll put a bit of glue on the can and press the end of the strip down.
Then wrap it all around the can until it looks "mummified" enough for you, cut it off and place a dab of glue on the end. Tuck the glued end under one of pieces that's wrapped around the can so that you can't see the end.
Lastly, figure out where on the can you want your eyes, the back of this can ended up have more sticking out so I did it on this side. You put two dabs of glue where you want the eyes, press the eyes on and voila! You have a cute mummy that probably cost you about 25 cents or less to make.
Now to the Candy Bouquet - these are way more fun with Christmas colors, but they are still fun for fall! For the first party I bought a 3 inch pot, 4 inch Styrofoam ball and a 25 oz bag (the $5 bag at target) of mini candies. I already had toothpicks and a few glue sticks. You hot glue all the toothpicks to the end of the candy wrapper. Hot glue the ball into the pot, then press all the tooth-picked candy into the ball. I used the whole bag of chocolates.
This is the part I forgot to buy when I went out for the other stuff, you also need a spool of thick wired ribbon, I used a whole spool, it was 3 feet of ribbon. You'll also need floral picks, they look like big green toothpicks with wire on one end (Michaels has them with their floral and Styrofoam stuff). You cut the ribbon into strips and scrunch the ends together, then wrap the wired end of the floral pick around it to make it stay. Then press all the ribbon picks into the Styrofoam around the candy.
To finish it, tie a ribbon onto the pot and voila, a cute candy bouquet! I had to hot glue the ribbon onto the pot to get it to stay. I only used about 3 small glue sticks for the whole thing!
Hope everyone is having a wonderful fall!!! It's crazy to think that Christmas is just around the corner, I really need to get started on Christmas projects!!!

Wednesday, September 21, 2011

Cute Plaques :)

I'm finally getting around to blogging again! Sorry for being gone so long, Morning Sickness has been kicking my butt!!! So onto funner things...
I made this fun plaque that I can't wait to get up on the wall! I just love the quote too!!! I spent half an hour or so mixing colors to get just the right red to match a red plaque saying that I have in my kitchen only to realize after I had the plaque painted that it was too dark to put black vinyl on. So I ended up going with white and I love it! (Ignore the fact that I used my sink to take pictures on)
This FUN plaque I've been wanting to make for a month now I finally whipped up today! I LOVE how the green looks with the black! I can't wait to get this up on the wall too! Which mean's I better start pulling out my Halloween decor :)
Both of these are super simple, just grab some craft paint, a little 1 inch foam brush. The paint was dry withing about 20 minutes, I sanded the edges up and pressed the vinyl on...super easy! Love quick projects!!!

Linking to:

;A place called home Monster Mash Bash

Monday, August 15, 2011

My FIRST wood project!

I LOVE my new desk! The desk cost 25$, then I spent about 18$ on paint and primer, I think it's a pretty good price, since I can't go to a store and find something like this! I absolutely love it! I can't wait to have all fun craft stuff in it! I finally feel like a real crafter now that i've redone a piece of furniture! So here is the
Before:
After:
The top edge turned out great, it was so fun sanding it! I spray painted the hardware black because I wasn't big on the brass color, and I didn't want to go spend money on cute hardware, I love how it pops against the white!
I loved sanding the drawers to match!
I love the two legs on it, it adds so much to it! I loved sanding this part to add even more character, it turned out better than I could have hoped!
I love how even the bottom has character!
For a first project, I think it turned out great! All I did was sand the top a little, primed the whole thing with 2 can's of Rustoleum Painter's Touch white Primer, then I used 3 can's of Rustoleum's Painter's Touch Flat White Spray paint! Then I sanded all the edges like crazy to give it the wonderful used look. The hardware was sprayed with Rustoleum's Painters Touch Black Spray paint. It was super easy, and turned out perfect for me! I am totally in love with it and can't wait to move it into my craft room tonight!

Sunday, August 7, 2011

Garden Goodness and I won something!

I am SO incredibly excited, I have won several giveaways before, but they have always been small. This time I won an Epic Letterpress on the blog Brown Paper Packages. I've never won anything big, and this is HUGE for me :) I am SUPER duper EXCITED to get it! Can you tell ;)

On another note, our (it's at my parents house around the corner from us, we had it put in while we were living with them, so it's a family garden, but we love it!) garden is producing some YUMMY looking melons and I can't wait to try them! My boys planted most of them from seeds in May, and they have gotten ginormous! I can't wait to plant more this fall!
My little guy hopped in the picture :) He loves the garden!

Saturday, July 30, 2011

My new Desk! Whoot Whoot!

This morning while searching craigslist I found this adorable desk! I'm in love with it! I"d like to change out the hardware and re-stain it because the top has some scratches that I need to sand down. This baby cost 25$ and it's solid oak! No particle board, yipee!!! I can't wait to get it into my craft room!!! (this is the picture off of the craigslist add).

Friday, July 29, 2011

Check it out!!!

So last Christmas I got this awesome cutter - it's the GO Fabric Cutter by Accu Quilt. I used it like crazy to make some rag quilts and haven't used it for anything else. So when a friend of mine posted about a quilt she had seen....


Made with THIS die cut....
I was SO excited! A die cut that can be used for the WHOLE quilt! You don't even have to cut other pieces!!!! That is SUPER exciting to me! I've never really made a quilt before but have always wanted to! Anyways, about this die cut, my wonderful amazing husband let me buy it today!!! Yipee!!! You know what I'll be doing tonight????? I'll be cutting me some quilt pieces and hopefully I'll get it sewn next week! I'll make sure to take pictures to show ya! Can't wait! Hope everyone has a great weekend!

Oh...on another note! I totally scored this week on toys at Target, they clearanced out a bunch of toys, 75% off! Needless to say, I'm done with Christmas and birthday's for my kids! Some of the Targets in town still have stuff so I suggest gettin over there and checkin it out! You can save a bunch!

Tuesday, July 26, 2011

Go Baby Cutter...Go enter :)

Aunt Polly's Porch is hosting this awesome giveaway! I just entered, it would be SO fun to win! I love this machine! I've used the Accu Go Quilt cutter and it's so easy to use! This is even better because it's smaller and easier to carry around! Love this! Go enter!

Monday, July 18, 2011

Vinyl...love it!!!

I had a 50$ gift certificate that I bought on groupon in march for 20$, so I decided to finally buy something for the house! I am so excited I did because I absolutely LOVE it! It adds SO much to our kitchen! I ended up spending 70$ and bought some other fun vinyl stuff that I'm sure i"ll be showing in the future, but until then, I just wanted to share this because I think it turned out so great! Still need to figure out what to put on the shelf above it, but that's another project :)

Monday, July 11, 2011

The Boys Room so far...

Originally the boys had their own room when we first moved in, but when we were working on painting our bedroom we moved the boys into the same room so that we could use one to sleep in. But we love it this way so now we have a guest room :)
We are hoping to have bunk beds made by Christmas for the boys. But until then we're leaving the little guy in his crib :) Still need to do something with the walls, but that's another project! Oh, and on a fun note, the quilt that's on the twin bed, bought it for 15$ at Target a year or two ago, it was 75% off! Love a deal!
This bookshelf is my favorite part! It has almost all of their toys on it! So now I'm not stepping on toys anymore! The boys know that before they go to bed they have to pick everything up and put it back on the shelf :) Love this!

Sunday, July 10, 2011

A Few Things Hung!

I was able to go to Hobby Lobby for the FIRST time ever last month...it was pretty much amazing! I had so much fun and I found these awesome wall hangings (they're made out of metal), one says "Action" the other says "Motion Picture". The wall need more on it since it's such a big wall, but now there's something. Eventually we want to get a bigger flat screen, and get a family picture in black and white in front of a movie set or something movie ish to hang in between the two hangings.
We hung up this plaque that my friend Aimee made us a few years back, it's the first thing you see walking into the house, the walkway under it leads to the kitchen and family room.
This is my FAVORITE, it's also metal, it says "Get Kisses from the Misses when you do the dishes". I bought it 3 years ago hoping I'd have a place to hang it, and alas...I do! Yipee! Eventually we plan to put some little curtains up, this is right over the sink in the kitchen!
The hubby and I bought this right before we moved to Tucson 4 years ago, we got it at Deseret book and thought it was super cute. It says "Once in a while, in an ordinary life, love gives us a fairy tale". I think it looks perfect here! Still working on finishing the chalkboard/magnetic cubbies, can't wait till they're done!
Still a lot to do, but we're making progress!

Saturday, July 9, 2011

Handmade Gift Exchange - 4th of July Placemats!

I participated in Craftaholics Anonymous' Handmade Gift Exchange, it was SO fun! I decided to make something new, I've never made place mats before, I've never really "quilted" anything before. So this was TOTALLY new for me! I love it though, I think it turned out pretty cute, I would love these...which, I still want to make me some for next year!
Here's a pic of the two I sent my Exchange buddy! I sure hope she likes them!
My Exchange buddy sent me the cutest little "USA" blocks, and two super cute hand towels with an "F" hand stitched on! I loved it!!! I'll have to take a picture this week so I can show you!


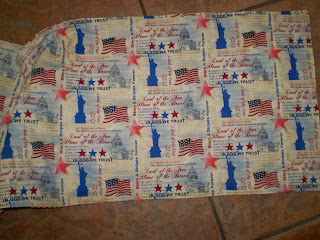
I was able to sew a table runner for me last weekend, basically two days before 4th of July, but hey, I used it for the weekend!
Here's a close up of the back, which is my favorite fabric, luckily I had just enough for the back!

Chairs!

I found a set of 6 dining room chairs (for 50$) on craigslist back in May and have been wanting to reupholster them ever since! It finally happened last weekend! I through a surprise party for my husband and wanted to get a bunch of stuff done before everyone came over, so my amazing parents came over and spent a day helping me get stuff done! I cut out all the fabric and foam for the seats and my dad reupholstered them for me! He spent about 6 hours working on them, he's amazing!
We have two (above) with arms, and then 4 without (below), we didn't do anything to the wood, it's in great condition (besides a few scratches that we can sand later if we want). The chairs were made in 1981, so the seats were 30 years old...and gross. Forgot to take a before pic, sorry!
Here's a close up of the fabric, it looks amazing with our paint colors!Now we just need to build our table!!!! But we have a few other projects to do first :)

Saturday, July 2, 2011

Curses!!!

Curses...that's my way of a bad word :) Okay, so I have all these FUN pictures to show you and I can't find the USB cord to get the pics off of my camera!!! This is terrible! Hopefully I can find it today, I made 2 cute 4th of July Placemats for a craft exchange that I did. Then I sewed a 4th of July Table runner so that I have something festive. I got some super cute blocks and hand towels from this craft exchange that are SO adorable! I got some pictures up in my house and I re arranged the kids room and guest room...and yet, I can't show you...tear! Oh well, hopefully I'll be able to soon!!! Oh, and we painted our bedroom and had carpet put in...which is why I can't find anything. Hope everyone is having a spectacular 4th of July Weekend!!!

Monday, June 20, 2011

Fabric Headbands - Girls Camp!

I have the wonderful opportunity to go to Girls Camp this summer with the girls in our Ward at Church. I LOVE it! It's so much fun working with the Young Women! The leaders get to make little gifts for the girls to give to them at Girls Camp; this is one of the gifts the girls will get. I am SO excited about them! They turned out cute! Here is a close up:
I ended up making 50 of them so that the leaders and girls get one :) Last week 2 friends of mine came over and helped cut out all the fabric and iron it so it would be quick and easy to sew. Then today I got up and my mom watched my kids all morning while I sewed all the flowers onto the band, then this afternoon I stitched all the buttons on. It took FOREVER! But I know they'll be worth it :) It feels so great to have them done!

Saturday, June 18, 2011

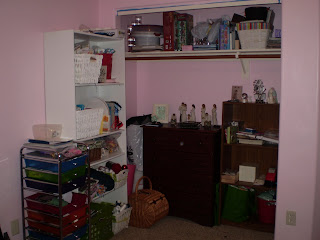
My Craft Room :)

Here it is as you wrap around the room, when you walk in I have this table set up to the left. My sewing machine and serger :) Which I still need to learn how to use, I can do basic stuff but that's about it!
To the right of the table as you wrap around the room is this bookshelf full of fabric, yes all of that is fabric :) Which is so exciting to me! I can't wait to start on some projects!!!
Oh and there is also our stack of wall decor that I need to hang...just have to figure out where! That's the hardest part, figuring out where to put everything!

and finally in the corner just to the right of the door is my stash of everything else!
On the Bookshelf I have:
-A basket full of about 25 patterns that I thought were cute and bought at one point or another, none have actually been used :/ Need to work on that!
-A basket full of serger thread
-A basket full of scrapbook knick knacks
-A basket full of ribbons
-Some pillow cases and receiving blankets that are done and ready to gift
-As well as yarn, ornaments, how to's for the sewing machine and serger, etc.
The statues on the dresser will eventually move, just have to get stuff set up on other rooms, but this is the safest place currently. The Dresser is full of fabric scraps, buttons and other little accessories.
The multi colored drawer thing - my friend found dumped in a parking lot to get rid of, she called me, and I snatched it up. It was pretty dirty, but a little soap and water got rid of most of it, it's just missing two drawers, which is fine with me :) I am just happy to have it!
Well it's not that exciting, I have big plans for it, but that'll be a while yet, I have too many other house projects to work on. But it is super functional and I love it because it's my own space to make whatever I want! Hope everyone has a wonderful weekend!