Sunday, October 31, 2010

Saving a Shirt!

My wonderful husband went out Saturday morning in search of some flannel shirts that we could cut up and use as patches on his pants for his scarecrow costume. He came home with these two adorable shirts:

They were size 18 months (which is perfect for Cooper), I looked at them and was like, no way am I cutting these up, they're TOO cute! So I figured out a way to save them! See how the dark brown one is short sleeved, well it was originally long sleeved! I cut off the sleeves and was able to get a patch from each sleeve! After I cut it off I turned it under just barely and sewed around it in brown thread:

Then voila! An adorable little shirt that I didn't have to chop! I can't wait to put it on him!

Sorry I didn't get a pic of the jeans, but they turned out great!

Friday, October 29, 2010

Have you Heard of...

Bountiful Baskets??? I'm sure most of you have! It's a great way to save big bucks on fruits and veggies! If you live out in Vail,AZ the pick up is next week, and then every 2 weeks after that. You go to bountifulbaskets.org between 9am on Tuesday and 10pm on Wednesday to order. They are a non profit company, you pay 15$ for the fruit and veggies plus 1.50$ shipping and handling and you get 2 baskets full of produce, one fruit and one veggie (it's the smaller round baskets, the two combined fit into 1 regular sized laundry basket). Anytime I've gone to the store to price all the fun and yummy produce it normally comes out to about 40$ worth of produce! ,The only thing though is that you don't get to pick what you get, you're given a variety or 6 fruits and 6 veggies so you get to try new things, I never liked Brussel sprouts until we got them in our basket and we tried a new yummy recipe for them! They also provide add ons to the basket, for example, the pie pumpkins my sister and I bought 2 weeks ago was through bountiful baskets! They were an add on to the basket - it was 6$ for 2 pie pumpkins and 2 mini pumpkins, we also ordered basket ball size jack'o'lanterns for 3.50$ (the same size were costing 6-7$ at safeway). They also have fresh baked goodies like breads and cookies as add ons from local bakeries. We love bountiful baskets and if you haven't tried it you should! It's a great deal!

Thursday, October 28, 2010

Seeds and Jars, Yum!

2 weeks ago my sister and I bought 10 pie pumpkins to can, last week was crazy so yesterday I figured I better get them canned. It took 4 hours and lots of mishaps with little ones but I finally for 6 of the 10 pumpkins canned, I canned 7 Quarts. Maybe tomorrow I'll get the other 4 done :) I was able to save a bunch of the seeds so I washed them and laid them on the cookie sheet and let them dry overnight. So then today I drizzled butter over them and Brycen doused them with salt and we baked them. YUM! Just to let you know the pumpkin looks pretty gross canned, but hopefully it'll taste super yummy! I'll try making a pie with it next week! Here's the pics!

Here's the site I used for the how to can pumpkin: http://www.pumpkinpatchesandmore.org/pumpkincanning.php

The seeds turned out super yummy, my jaw is sore from eating so many :)

Wednesday, October 27, 2010

Young Womens in Excellence Decor

My sister and I had the opportunity to help decorate at the Young Womens in Excellence night for the girls at our church. My sister was able to use my mom's chair covers and borrow the rest that she needed from our friend (80 chair covers in all). The church already had the white table cloths, so to spruce it up some I went to JoAnn's last week to buy some gold fabric to make sashes for every other chair (we made 40), and to buy some red fabric to make squares to put on the table under the vase centerpiece. The girls had picked red and gold as the colors they liked so we wanted to stick with those colors. Well Saturday morning I cut out the squares and realized they weren't big enough, so I ran to JoAnn's again to buy more red fabric. Over the weekend I made the mistake of starting a 400 page book and couldn't put it down of course, so there went any work I could of done Saturday and Sunday. So on Monday I woke up and realized I didn't have enough gold fabric, so I ran to JoAnn's yet another time :) I really should have measured stuff the first time! Then I went over to a friends house to cut all the fabric since she had a cutting mat. Man this is turning into a long story...it gets longer :) My friends said that I should use the serger I owned, I've had it since January and haven't opened it, since I have no idea how to use it...well I figured that would probably be the only way I could get them done on Monday. Not to mention the fact that I had homework due first thing the next morning. So around 6 o'clock I finally open the serger...I was so totally lost, then my oh so wonderful and amazing husband, who's only night home this week was monday, sat for an hour setting it up for me - I love this guy! Then our oh so wonderful and amazing friend came over and helped us set it to the right stitch and let us borrow some red thread since I didn't have 3 spools of red. I had 10 or so sashes that I had to run through 2 or 3 times because I kept messing up, which I realized was due to the fact that I was using metallic thread. DO NOT use metallic thread on a serger, it SO doesn't work out good. I got about 15 or so sashes done before my sister came over and helped finish the sashes while I did homework. I couldn't have gotten it done with out my wonderful husband, awesome friend and amazing sister - THANK YOU! After she left I got the 10 red squares done. So I was able to get everything done by midnight :) My sister made the awesome looking vase centerpieces. Didn't she do an AMAZING job! SO here are the pictures to this super long story that probably doesn't matter but I felt like typing :)


The whole night was gorgeous! All the girls and leaders did an awesome job!

Tuesday, October 26, 2010

Receiving Blankets!

I made 10 receiving blankets today! YAY! So excited about being able to use the serger I've had for 10 months! I'm too tired to get the pictures off my camera, so i'll post pics tomorrow, but they are way cute!
**here's the pics :)

Monday, October 25, 2010

Delectable Pumpkin Muffins/Bread :)

I love this recipe, I found it in an old Betty Crocker Cookbook of my moms!

Pumpkin Bread Recipe:

2/3 cups Margarine
2 2/3 cups Sugar
4 eggs
1 16oz can Pumpkin (about 2 cups, I sometimes add 2 1/2 cups)
2/3 cups Water
2 tsp. Baking Soda
1/2 tsp. Baking Powder
1 tsp. Ground Cinnamon
1 tsp. Ground Cloves
3 1/3 cups Flour
*nuts and raisins (optional, I normally don't add these because i'm not big on them but you're welcome to throw in as many as you like)

Heat oven to 350 degrees. Grease 2-3 loaf pans or it makes 3 1/2 - 4 dozen muffins.

Cream the sugar and margarine!

Add in the eggs, pumpkin and water.

Mix in the flour, soda, powder and spices until well mixed!

Then fill the pan, I used a medium sized pampered chef scooper to plop the batter into the cupcake wrappers, it was the perfect size and they turned out perfect! :) You could also just spoon the batter into the pans(which is what i normally do). Fill about half way.

They should cook for about 20 minutes depending on your oven, to make sure they're done just stick a toothpick or knife in the center of one and if it comes out clean then they're done! Within a few minutes you should be able to eat them too! Of course, I normally snag one as soon I pull them out because the smell is amazing!

We made these yesterday and they are almost gone! I was able to take plates to two friends and we still had almost 2 dozen left, LOVE IT!

Sunday, October 24, 2010

Halloween Centerpiece and free Canvas :)

For my craft night this past week I was trying to come up with a festive centerpiece to use, since our house doesn't look very Halloweeny, so I made some more mummy cans and filled them with that yummy halloween peanut butter taffy (I love that stuff), then took a piece of fabric from the pajama pants I made for my kiddos and tied it around the vase with the black twigs. It wasn't too festive, but I enjoyed it :)

I'll post some pictures from the craft night this week, it turned out great and was SO much fun!

**Free Canvas** If you use this link you can get a free 8x10 Canvas from Canvas People, all you pay is shipping. Or you can get a 55$ credit towards a larger canvas! Just copy and paste this link: http://www.canvaspeople.com/freegift
I have never ordered from them before so I don't know what kind of quality it is, but I'm excited to get mine! As soon as I do I'll post a picture! I ordered an 11x14 family picture! It cost $27.94 ($17.95 shipping, and $9.99 for the upgrade).

Saturday, October 23, 2010

Free Leather Bound Photo Book!

I was looking at couponsandfreebiesmom.com and found this awesome deal! If you go to Kodak.com you can get a free 5x7 leather bound photo book, it's a 40$ value! The shipping is supposed to be $1.99 and that's all you'd have to pay, how awesome is that! I am definitely going to order me one this week! You could use it as a Christmas gift for the parents or in-laws! Use coupon code TARGBOOK you have until Nov. 6th to do this, so don't put it off, get it done now :) Plus if you're a new sign up to Kodak.com you get 50 free prints!
Here's the link to the couponsandfreebiesmom site, you can find some awesome deals!
*http://www.couponsandfreebiesmom.com/2010/10/free-5x7-photo-book-free-leather-bound-photo-book.html

A little early :)

Here's a quick but fun craft for christmas - it makes a great gift and you can fill it with yummy treats to give to friends!

All you need it red, white, and orange felt, some black buttons for the eyes, some black fabric paints for the eyebrow and mouth, some cute strips of christmas fabric and a little bit of leaf/berries. So fun to make. Just hot glue it all to a can and voila! A cute and creative christmas gift!

Thursday, October 21, 2010

Halloween Pajamas! My boys love them!

Last week when I went to JoAnn's my son kept running around, so I told him if he was good I'd make him a pair of pajamas and he could pick out the fabric! Which worked for a while :) So here are the awesome pajamas that we made on Saturday!
Brycen was being super silly, this was probably the tenth picture I'd taken, so he was having fun with it!

My youngest son didn't want to sit and take pictures, so matter how many times we tried to take his picture, he refused to look at the camera...little stinker...but he's sure a cutie :)

They were super easy to make, in fact I'm hoping to have time to make me a pair today! If so I"ll take pictures of how to make them!

Tuesday, October 19, 2010

Simple and fun favors!

I posted how to make the super cute metal scrapbook brad earrings, well I had a small party last week and used those as favors! All you need is some cute ribbon, some little bags and the earrings (I used the wilton treat bags since I had them)

Then ta-duh! Cute and simple favors!

Monday, October 18, 2010

Just bought this! Awesome deal!

So since this blog is called Confessions of a Clearance Shopaholic I might as well tell you what fun thing I bought today! I am so excited to get it in the mail! I found this awesome find! Canvas people are having this awesome deal - you can get a free 8x10 canvas photo for free! All you pay is shipping! Or you can get a $55 credit towards a larger canvas. I just ordered an 11x14 canvas and it cost a total of $27.94 (that includes shipping)!!! I could never pay full price for a canvas print because they are so expensive. But I can handle this price! I am so excited!!! Just visit:
http://www.canvaspeople.com/special-offer?utm_source=HO_CP&utm_medium=Affil&utm_campaign=promo
to check it out!!!
I found it through this blog: http://craftedition.blogspot.com/

Saturday, October 16, 2010

Super lazy!

Okay, so I said I'd post how to make the quiet books/brag books! Here is the tutorial I used! I can't find the pics I took of making this so I'm being lazy and just posting the links:
http://brownpaper--packages.blogspot.com/2009/12/purse-sized-photo-brag-book.html

Friday, October 15, 2010

Brag Books :)

A cute little personalized book that you could fit right in your purse! You can fill it with pictures! Or any other fun thing you want, you could also turn them into quiet books for you kids to look at :) I'll post how to make them tomorrow!

Wednesday, October 13, 2010

Button Earrings - I love them!

I've seen a couple variations of these on other blogs, so I decided to try it out! They turned out great! See:

Here's how easy they are:
You need a pack of earrings (these are the same ones I used on some earrings I made last week)

and a pack of cute scrapbook metal brads (these are almost always on sale at JoAnn's):

- You'll also need a hot glue gun, a pair of scissors and some earring backs -
Once you pull them off the package, cut off the prong (make sure you cut off as much as possible).

After I cut off the prong part I used my scissors to push down the little bit that was left so that it was flat. Then all you have to do is place a small dot of glue on (from your handy dandy hot glue gun) and push the earring on...

the glue takes less than a minute to dry! I love hot glue guns!

They cost about .57 cents each (I got the glue, earrings and brads on sale)! Super cheap for some really cute earrings!

Tuesday, October 12, 2010

Felt Stories - so fun!

Last month I was searching the internet trying to find a cheap way to make felt stories, I really wanted some for family home evening! I found some really cute stories on etsy but they were still 10$ plus shipping per story, so I found this website: http://alittleofthis---alittleofthat.blogspot.com/2010/01/felt-figure-fun.html
It gives a full tutorial of how to make some inexpensive felt stories! All you need is:
-Avery T-Shirt Transfers ($7.49 for a pack of 6 at walmart)
-white felt (you can get felt sheets for .29 cents at Michaels)
-an iron
-a pair of scissors
-an ink jet printer
You download the stories from - http://chocolateonmycranium.blogspot.com/2007/11/flannel-board-stories.html You can link to her site from the above tutorial too!
Then print the stories on to the T-shirt transfers, cut out the pieces, iron them onto the felt and cut them out again. Now you have some inexpensive stories! Super easy right! It comes out to about $2.25/$2.50 per story (most stories are only one sheet, but there are some stories that are longer) for the ink, felt and transfer paper. I made 5 stories, but have the supplies for more. I also bought some white felt to make a board, but I'll have to make that next week :) Here's some pics of the the pieces I made!

Monday, October 11, 2010

Cake Pops, fun but messy!

We dumped the cake we made (we let it cool before we did this obviously) into a big bowl, then grabbed a container or betty crocker vanilla frosting. Mixed them all together and formed them into round balls. Brycen pretty much just ate the cake mixture! We then froze the balls for an hour or so.

We dipped them in melted chocolate then doused them with sprinkles :) Brycen got a little sprinkle happy!

Ours didn't look very pretty but they were way fun to make :) Brycen had fun dipping them in chocolate and putting sprinkles on them!

We actually did these last month, it was fun! I wasn't big on the taste though...

Saturday, October 9, 2010

Spooky Vase!

Okay so here is an idea, super easy! I found some small branches, spray painted them black and am going to use them as a center piece for a halloween party i'm doing :) I'll post the full center piece later. I hope to post a craft everyday from now on! I missed yesterday due to being out of town, i'll have something fun tomorrow to post!

You could even hang some little ghosts or pumpkins from the branches, or glue some holiday ribbon around the vase to make it more festive OR you could add some etched glass halloween figures to the vase!

Thursday, October 7, 2010

BOO!

I finally used Modge Podge! Whoot Whoot, and it is pretty fun! I found these plaques, i've seen several varieties of stuff like this, so I decided to spray paint them black (since I had the spray paint out from the wreath I made yesterday). Then I sanded them a little, modge podged some scrapbook paper cut outs on, then painted some varnish over them - and Voila! Some fun 'BOO' plaques! I still need to decide where to hang them...I think I'll got glue on some ribbon to the backs or else staple gun on some ribbon, we'll see. But here they are:

Wednesday, October 6, 2010

Complete Halloween Awesomeness!!!

Okay, so maybe it's not that awesome, but I think it is, especially since I've never made something like this before! I saw this here: http://deliacreates.blogspot.com/2010/10/free-halloween-challenge-part-ii.html
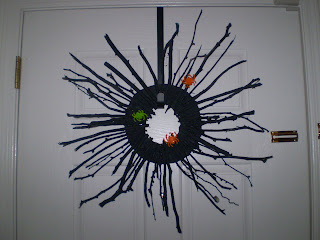
So yesterday afternoon Brycen and I plus my three nephews went in search of branches/sticks. Which, if you have lived in Southern AZ you know that finding sticks is not that easy because there are no trees, just big bushes. We were able to find all of these in the wash, it was actually really fun scavenging for them! This morning Brycen and I went to Walmart in search of some black spray paint! And...we found some, for a dollar!!! Which is really exciting!
When we got home we cut out a round piece of card board with a hole in the center, hot glued on the branches then painted it black! I love it!

I threw on some spider rings :) to make it more fun! I think it looks VERY halloweeny!

Tuesday, October 5, 2010

Mummys from Scraps!

I saw these on a friends craft blog and thought they were SUPER cute !

I used a regular can, we had an empty can of green beans (the taller mummy) and an empty can of tomato sauce (the shorter mummy). I used the cheapest white muslin I could find and cut it into strips, then tied them together while I was watching tv. It's super fast! I glued the fabric around the can with tacky glue so that it would stay in place. Then I found a pack of eyes at Michaels for cheap - I used a coupon. I glued the eyes on tacky glue as well and voila! Cute little mummies! The ones I made after these turned out a little better, they weren't as tight and looked more mummie-esque!

Monday, October 4, 2010

Almost Free Bookmarks :)

While looking at peoples blogs over the last month I found these super cute bookmarks/tags idea from here: http://notsoidlehands.blogspot.com/2009/06/chalkboard-tagsand-more.html

All you need for these are some empty cereal boxes or similar cardboard, you spray the shiny side with chalkboard paint (which is only $3.64 at the walmart here) and then glue some pieces of scrapbook paper you have lying around on the other side. Punch and hole through it and tie a ribbon :) Easy peezie!

The awesome part is that you can use them as book marks, which, if you're like me anytime I find something to mark where I'm reading it disappears before I even finish the book. So now I have a large supply of them! Plus I could throw them in my hubby's lunch and write "I love you" on the chalkboard side, or something cute and sweet to him! Or I can use them on gifts as tags, for example - I could write "Boo" on a small one and attach it to this halloween pop top can I've made and give it as a fun gift!

For these pop top cans all you need is a can that has a pop top and a regular bottom (see pics):
This bottom works

this bottom is rounded - it wont work

See the difference:

The reason you need a rounded bottom is so that you can open it with a smooth open can opener. Then after you clean it out, glue on some scrapbook paper you can put some candy in it and hot glue the bottom back on. Super easy and cute!

Sunday, October 3, 2010

Home Goods versus Dollar Store!

I've been in Home Goods once before and wasn't big on it, but I didn't really look at anything that closely. So as I was walking by it yesterday I thought maybe they'd have some cheap plates and bowls. Lucky for me they did! I found this super cute plate and bowl! All you need to make a super cute cake stand are these 3 items:
A plate (cost me $2 at Home Goods)

A bowl (cost me 2$ at Home Goods)

and some glue (costs $1.00 at Walmart - I had enough glue to make 3 cake stands with this one tube!)

Turns into this super cute cake stand! It cost $4.33 total, compared to the 30$ or more cake stands you see at stores. I don't think I could have found one this cute even for $30, I love it. In fact, my mom and dad love it too, so maybe I'll give it to them for Christmas :)

While I was at the dollar store this past week I found this plate and bowl for a dollar each!

and Voila! $2.33 for a simple cake stand! If you want to make it extra special you could even get some vinyl that says "Santa's Cookies" or "Happy Halloween" then make some yummy cookies to put on it and it's a great gift for a friend or neighbor!

I got the idea from my friend! Check out her and her sister's craft blog:
http://kissingfrogstoo.blogspot.com/
They have some really fun and cute ideas!

Saturday, October 2, 2010

Earrings! So fun!

So I bought these at Michaels today! I used 2 40% off coupons plus a 20% off coupon! To make one set of earrings it cost me less than 25 cents!!!! How awesome is that! Plus they sparkle! The flowers are scrapbook stickers (so someday I may need to actually glue them on). You could also glue on buttons or scrapbook brads. Way cheap earrings that are way fun. My niece thought it was fun to put one of the stickers on her ear so that she could wear earrings too :)

See how cute they turned out!

Check it out :) I think they are way fun!